A neighbor came over last spring absolutely defeated. His basement had taken on about two inches of water overnight, and he’d had a sump pump sitting in the pit the whole time — installed by a “handyman” the year before. Turns out the discharge line was undersized, the float switch was zip-tied in a fixed position, and the check valve was installed backwards. Three common mistakes, one flooded basement, and a very expensive lesson.
That story stuck with me because I’ve been through my own version of it. When I first tackled a sump pump installation without really understanding the hydraulics involved, I ended up with a unit that short-cycled every 45 seconds and burned out its motor in under eight months. So let’s actually walk through this properly — from pit sizing to wiring — so you don’t repeat either of our mistakes.
Understanding What You’re Actually Buying
The sump pump market in 2025 is flooded (pun intended) with options ranging from $60 box-store specials to $400+ cast-iron workhorses. The spec that matters most — and gets ignored most — is the gallons per hour (GPH) at your actual head pressure, not the headline GPH printed on the box.
Head pressure is the vertical distance water has to travel from the pump up to the discharge point. Most residential installations have 8–15 feet of vertical lift. A pump rated at 3,000 GPH at 0 feet of head might only move 1,800 GPH at 10 feet. Always look for the pump curve chart, not just the headline number.
- 1/3 HP submersible pumps — Good for average rainfall regions with small pits (18–22 inch diameter). Expect 1,500–2,200 GPH at 10 ft head. Brands like Zoeller M53 have proven track records.
- 1/2 HP submersible pumps — The sweet spot for most homes in moderate-to-heavy rain zones. Wayne CDU980E and Liberty Pumps 257 consistently score well in independent tests at roughly 3,000–3,600 GPH at 10 ft head.
- 3/4 HP and above — Reserved for high water table situations, larger pits (24+ inches), or homes with multiple entry points. Zoeller 98 and Basement Watchdog BWE are common contractor picks.
- Pedestal pumps — Motor sits above the water, easier to service, but noisier and less efficient. Consider these only if your pit is too narrow for a submersible (under 16 inches).
- Battery backup systems — Not optional if you’re in a storm-prone area. The Basement Watchdog BW4000 or Wayne WSS30VN offer dual-pump systems that kick in during power outages, which is exactly when you need them most.
Pit Sizing and Liner Installation — Where Most DIYers Cut Corners
The pit (technically called a sump basin) needs to be sized to your pump’s cycling behavior. Too small, and the pump short-cycles — turning on and off every minute or less. Each startup draws 3–5x the running amperage, which is what burned out my first pump. The general rule: your pit volume should allow at least 2–3 minutes between pump cycles during normal inflow.
For a 1/2 HP pump moving around 3,000 GPH at your head distance, you’d want a pit that holds at least 15–20 gallons between the off-level and on-level of your float switch. A standard 18-inch diameter liner at 24 inches deep holds roughly 25 gallons — that’s your minimum. Many plumbers will recommend 24-inch diameter liners, which hold closer to 45 gallons and give you much more breathing room.
If you’re installing from scratch in a concrete floor, rent a rotary hammer with a chisel bit. Cutting a 22-inch hole through 4-inch concrete slab takes about 45 minutes with the right tool. Use a perforated liner (holes around the sides) so groundwater can enter from the sides, not just the bottom — this dramatically improves response time during heavy rain events.
Discharge Line Sizing — The Mistake That Killed My First Pump
This is where I went wrong. I used 1-inch PVC because it was cheap and easy to route. The problem: most 1/2 HP pumps are designed for 1.5-inch discharge. Running a 1-inch line on a pump designed for 1.5-inch creates backpressure that forces the motor to work harder, increases heat, and shortens motor life significantly. I saw motor temperatures climb from a normal 140°F to over 185°F under sustained load — that’s thermal damage territory.
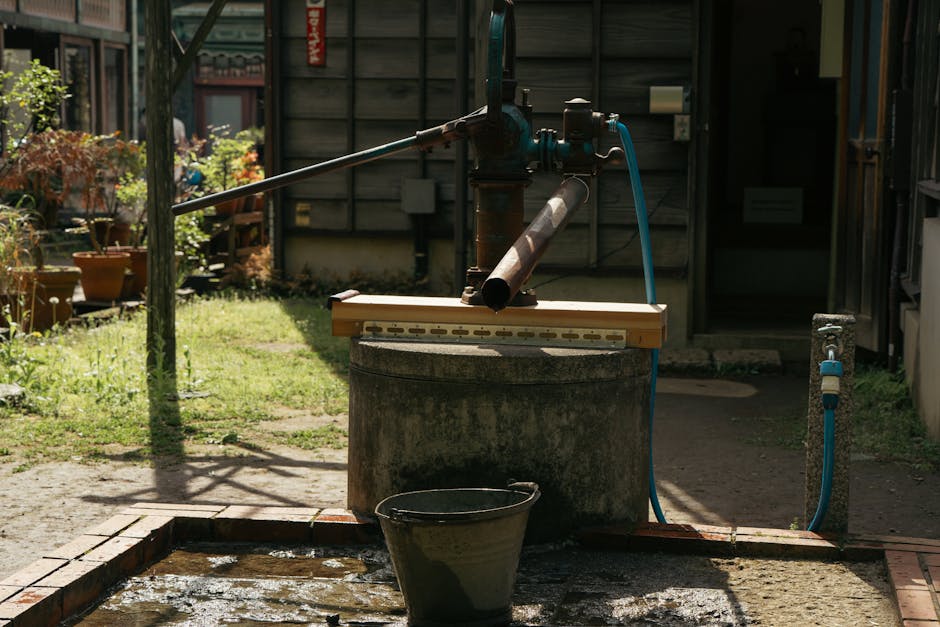
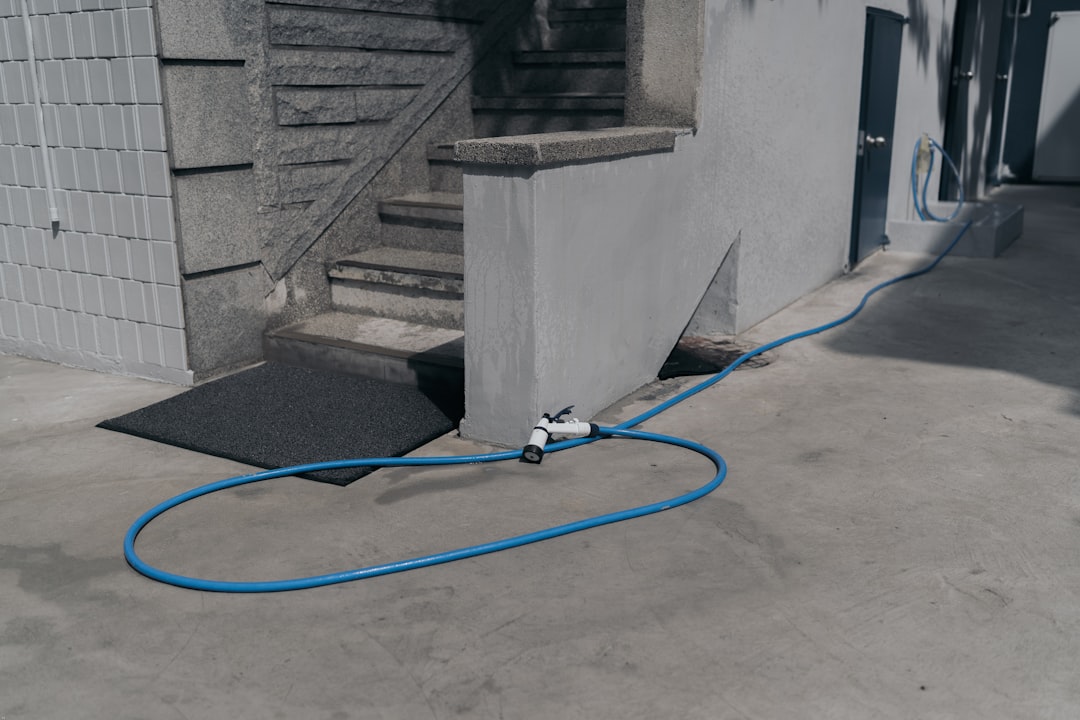
Use 1.5-inch Schedule 40 PVC for most residential installs. Run the line up and out through the rim joist, ideally with a slight downward slope after it exits the foundation so it drains completely and doesn’t freeze back into the house. Install a spring-loaded check valve within 12 inches of the pump outlet — this prevents backflow from draining back into the pit every time the pump shuts off, which would cause immediate re-cycling.
Float Switch Positioning — More Critical Than You Think
Your float switch controls the on/off cycle of the entire system. Set it too high, and you’re risking water reaching your floor joists before the pump activates. Set it too low, and the pump runs constantly on a high water table, wearing itself out unnecessarily.
A practical starting point: set the float to activate the pump when water is 8–10 inches from the bottom of the pit, and set it to shut off when water drops to 4–5 inches. This gives you a 4–5 inch cycling range, which on a properly sized pit translates to that 2–3 minute cycle interval we want. Tethered floats (the type that swing on a cord) give you the most flexibility. Vertical floats (mounted directly to the pump) are more reliable in narrow pits but offer less adjustability.
Wiring and Code Compliance in 2025
Most jurisdictions require sump pumps to be on a dedicated 15-amp or 20-amp circuit with a GFCI outlet. Yes, GFCI — even though it feels counterintuitive to put a GFCI near water. The NEC 2023 code (now adopted in most states) requires GFCI protection for all 15A and 20A receptacles in unfinished basements. A sump pump tripping a GFCI is actually a sign of a problem — either moisture in the motor or a wiring fault — and you want to know about that before it fails silently.
Never share a sump pump circuit with other basement outlets or shop equipment. Motor startup surge (that 3–5x amperage spike) will cause nuisance trips on shared circuits. If your panel doesn’t have a spare slot, this is genuinely worth adding a circuit for — a licensed electrician typically charges $150–$300 for a dedicated basement circuit in 2025, which is cheap compared to a flooded basement.
Testing Before You Trust It
Once everything is connected, do a bucket test before backfilling or sealing anything. Pour 5-gallon buckets of water into the pit, one at a time, watching for float engagement, pump activation, water movement up the discharge line, and float shutoff. Common issues caught at this stage:
- Float tangled on pump body — Pump never shuts off. Solution: reposition tethered float cord length.
- Check valve installed backwards — You’ll see the water level stay high after the pump runs. Arrow on valve body should point away from the pump (toward discharge).
- Air lock in discharge line — Pump runs but moves no water. Usually caused by a low spot in the discharge line that traps air. Re-route or drill a small weep hole (1/8 inch) just above the check valve.
- Excessive vibration noise — Pump isn’t seated flat on the pit bottom, or discharge line is rigid against the joists. Add a rubber isolation pad under the pump and a flexible connector at the pump outlet.
Maintenance Cadence That Actually Makes a Difference
Most sump pump failures happen not from defective units but from deferred maintenance. Here’s a realistic annual schedule:
- Every spring (before storm season): Pour water in the pit, confirm float and pump operation, inspect check valve for debris.
- Every fall: Clean the pit of sediment, inspect discharge line exterior for rodent damage or frost heave, test battery backup if equipped.
- Every 3–5 years: Even if the pump is running fine, consider proactive replacement. Most residential pumps have a realistic service life of 7–10 years. A $200 planned replacement beats a $5,000 emergency at 2am.
If you’re in a region with iron bacteria in groundwater (common in the Midwest and Mid-Atlantic), you may see reddish slime buildup in the pit. This clogs float switches and impellers fast. Use a pit-safe disinfectant annually and consider an iron filter on your incoming water supply if the problem is severe.
Installing a sump pump correctly isn’t glamorous work, but it’s deeply satisfying when a serious rainstorm rolls through and your basement stays bone dry while your neighbors are renting shop vacs. The gap between a pump that lasts 3 years and one that lasts 12 is almost entirely in these installation details — pit sizing, discharge diameter, float positioning, and dedicated wiring.
If you’re not comfortable with the concrete cutting or electrical work, hire out those specific pieces and DIY the pump installation itself. Most plumbers will do a pump swap (no concrete work, existing wiring) for $150–$250 in labor. That’s a reasonable middle ground between full DIY and a $600+ full-service install.
From the Bench: The single upgrade that’s given me the most peace of mind isn’t a fancier pump — it’s adding a water alarm float (a $15 device) set 2 inches above my normal pump shutoff level, connected to a Wi-Fi alert. If the pump ever fails or gets overwhelmed, I get a phone notification before water reaches my floor. Low-tech backup for a high-stakes system. Highly recommend adding that to any installation.
📚 관련된 다른 글도 읽어 보세요
- 공식 문서에 속지 마라: 서버리스 아키텍처 풀스택 개발 적용법 2026 실전 가이드
- Why I Stopped Using Random Prompts — The Real AI Prompt Engineering Guide for 2025
- Serverless Architecture for Full-Stack Development in 2026: A Practical Engineer’s Guide
태그: sump pump installation, basement waterproofing, sump pump sizing, DIY plumbing, basement flood prevention, submersible pump setup, home maintenance
Leave a Reply